|
Frank's Tool Techniques
Written by Frank McGill.
Building your own storage shed project for your backyard can be an extremely rewarding experience, especially when the result is a clutter free environment. But if a shed plans project requires the use of a tool you have not used before, you need an introduction to the tool in order to use it properly and safely.
The following tools and techniques are typically required when you build a shed, or woodworking project of any kind. Remember to follow the safety precautions outlined in the owner's manual whenever operating a power tool.
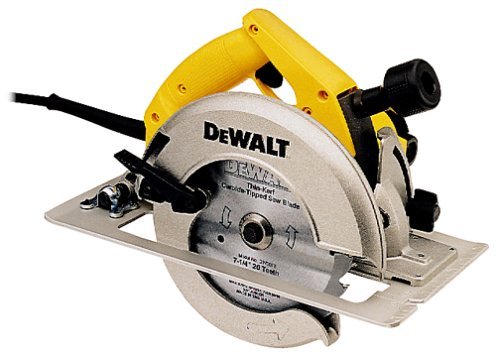
Circular Saw
The circular saw is a frequently used, general purpose saw. You cannot build a shed without one. It can be used to make straight and bevel cuts in a variety of materials. Use a circular saw to make rip or cross cuts in sheet goods, as well as dimensional lumber. To avoid injuring yourself or damaging the saw, always use the proper blade for the material you are cutting.
To operate a circular saw, line up the cutting guide with the waste side of your cutting line, start the saw, and push it through the material, using even pressure. Practice using your circular saw on scrap material before cutting the work piece, continue practicing until you've learned to recognize exactly where the cut will fall. If you have difficulty making cuts, continue to practice on scrap wood.
There is much to consider when selecting a circular saw, the first of which is the saw’s size. The size of the saw is described in terms of blade diameter. You’ll find saws that are from 4 3⁄8" to 10 1⁄4" with a number of entries between.
So, how do you choose? To begin, take a look at the depth of cut that can be made with the saw set at 90º and at 45º. As you begin building projects from this series you’ll find that your materials will be mostly 3⁄4" or 11⁄2" thick. So, the need to cut these materials should inform your purchase.
A 4 3⁄8" circular saw will cut only 1 1⁄4" in thickness set at 90º, and 3⁄4" when angled at 45º. So, it’s obvious this saw is not the one for your shop. You’ll find that a 61⁄2" saw just clears a 11⁄2" cut at 90° but because the size is a bit odd, you may have trouble locating blades.
The most popular size of circular saw is the 71⁄4". Any store that carries circular saws will have a complete line of 71⁄4" saws from which to choose, as well as a number of different blades designs (we’ll discuss those in moment). The depth of cut with the 71⁄4" saw at both 90º and 45º is more than required. This saw meets or exceeds the requirements of most woodworking so there is no need to look into bigger models that are heavier, higher in cost and unwieldy as well.
Saw Designs
Circular saws are divided into two general categories – worm drives and in-line saws, also known as sidewinders. Worm drives are easily recognizable due to their design. The motor sits behind the blade, which is driven by a worm gear (the gear looks like a curled worm.) These saws provide a good line of sight while cutting and will extend your reach across sheet goods, but they are more expensive than sidewinders. And, because wormdrive saws are much heavier saws – 14 to 16 pounds – they can be awkward to use because they tend to be front heavy.
Sidewinders, so named because the motor sits beside the blade, are the most common configuration. A sidewinder provides a better balance in your hand because the handle is directly above the motor. Bottom line: I recommend a 7 1⁄4" in-line saw.
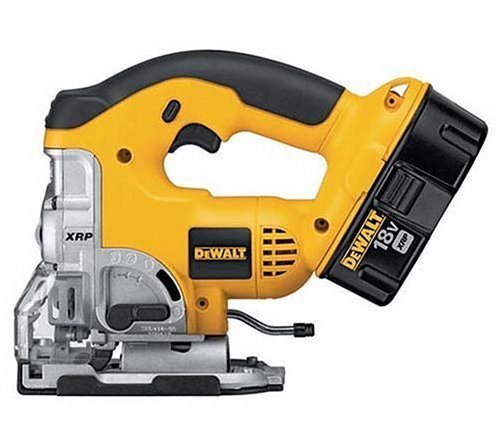
Jig Saw
The jig saw is an ideal tool for cutting curves or smaller straight cuts in situations where a circular saw would be impractical.
A wide variety of jig saw blades are available for different types of cuts. Some jig saw blades are designed to make rough or smooth cuts, while others are sized to make tight curves.
Standard blades cut on the up stroke. This upward cutting action sometimes causes splintering on the top side of the work piece. For this reason, always cut from the back (or unexposed) side of your work piece. Reverse-tooth jig saw blades are also available. These blades, which cut on the down stroke, provide a cleaner cut on the surface of the material in situations where turning the piece over is not practical.
Before making cuts with a jig saw, clamp your piece firmly in place so that it overhangs the edge of the work surface. Otherwise, the vibration of the saw may cause your work piece to "jump" from the work surface. Jumping may cause the blade to bounce off the cutting ling, or may bend or break the blade.
Maintaining constant pressure when making a cut, and release the pressure as you approach the end of the cutting line. To make internal cutouts with a jig saw, drill starter holes near the cutting lines and then finish the cutout with the saw.
This tool seems so simple, yet it is a subtle thing, capable of immense finesse in skilled hands. There are lots of features on this tool that are rarely discussed from a furniture-making perspective, but that’s exactly what we’re going to do here.
First, there’s the body style of the saw. There are two kinds of bodies: the common top-handle grip and the more European barrel-grip style. I absolutely hate to do this to you, but I encourage you to look for the barrel-grip saw. It bewilders me that the top-handle saw is the dominant style in this country. These tools are more tippy and harder to steer than the barrel grip tools. This tippiness is not a big deal when you’re just trying to notch some 2×4s on the job site, but it makes an appreciable difference in the shop. Keeping both your hands and the tool lower to the work improves your control. This maxim is not just for beginners; this applies to everyone.
The next most important thing is the blade-release mechanism. This is something you’re going to be using quite a bit, so it should be simple. The best blade release mechanisms are almost effortless: Pull a lever and the blade drops out or pops out. Lots of saws have sticky mechanisms – you don’t want to have to grab the blade and wiggle it or tug it to remove it from the body. Eventually you will cut yourself.
Older saws need special screwdrivers or require you to twist a knob a good deal to remove the blade. Avoid these if you can because there are less frustrating ways to work. Speaking of blade-holding mechanisms, there are two dominant styles of blade-holding mechanisms on the market: a T-style and a Universal style or U-style. The T-style blade has a (surprise) T-shaped shank on top. The Universal-style blade has a hole bored in the blade. I’ve used both. I don’t really have a preference. In fact, my preference is to buy a jigsaw that can hold either style blade. The jigsaw gurus tell me that this compromise results in a blade-holding mechanism that is weak. But I have never had a jigsaw blade come out of the tool while I was working.
Jigsaws have different strokes, which is the amount that the blade travels up and down in the tool. A 1" stroke is typical and fine. Shorter-stroke saws are generally at the very low end of the price spectrum and should be avoided anyway. You’ll also see a lot of hype about the amperage of a tool. By and large, this is not important for furniture work. I’d give up a couple of amps of alleged power in exchange for a 12' power cord any day. And do check the length of the cord. A short cord will get hung up your work where the plug meets the extension cord.
Another feature that gets played up is the orbital setting. The orbital setting is the amount that the blade will travel back and forth in the cut. Usually, most saws have four settings: zero, one, two and three. Zero means no forward movement, which results in a slow cut but a clean one (generally). Three is when you need to cut plywood to cover your windows for an oncoming hurricane. It’s fast and rough. Set your saw to one and you’ll be fine until you move into the thick stuff.
How about a blower, do you need one? A blower puffs away dust from your cut line to make it easier to follow. I like a blower, otherwise I find myself doing all the puffing and turning blue. How about a work light? It's not a must-have, but if your saw has one, you’ll use it and like it. It can get dark down there by the blade.
Other features aren’t so important. How you bevel the base of the saw is pretty irrelevant – some manufacturers play up the fact that the saw requires no tools. I rarely fi nd the need to bevel the base. Once a year maybe. So no big deal. Do make sure that your blade is cutting straight down. You can check this first with your combination square, but keep the ruler away from the teeth of the blade. The teeth can be bent, or set, to either side of the blade on some blades. Register the ruler against the steel behind the teeth.
Then make a careful and straight cut off the end of a board. No curves (these tend to deflect the blade). Now check the finished cut with your combination square. If the cut is square, you’re good. If it’s not, then tweak the base of the tool until the resulting cut is square. Now cut a curve at a comfortable pace and check the work. The edge should be square to the face. If the blade deflects, then slow down your cutting pace.
You do need variable speed at the trigger – the more you press, the faster the blade goes. This is common on all but the cheapest tools.
Jigsaw Use
Like any portable saw (hand or power) you want to have a pencil line that shows you where to cut. Always cut to one side of the line – the waste side. Cut as close as your skills allow. The less wood you leave, the less clean-up work will ensue, but the more disastrous the mistakes will become. I shoot for 1⁄32" of waste left or less.
The jigsaw is a two-handed tool. One handed use is for hot dogs. One hand should grasp the tool’s body and trigger. Use the thumb on the other hand to press the base against the work. I use both hands to steer the tool. My trigger hand supplies the forward motion and does the heavy steering. My other hand provides the small adjustments that are critical to tracking my line. The thumb also keeps the saw from jumping up and down in the cut. If you keep the saw’s plastic guards in place, this is quite safe.
You also need to know about relief cuts. These are the difference between success and disaster at times. Simply put, relief cuts are cuts you make into the waste that allow you to remove the waste one chunk at a time. They’re sort of like waypoints for your tool. When your waste comes out in small chunks, it’s less likely to droop and split and splinter, which can ruin your work. It also allows you to turn curves that are a bit tighter by freeing up space behind the blade, allowing it to turn.
I usually make a couple of relief cuts where my cutline is heading into a turn or coming out of a heavy turn. Also, I’ll make a relief cut when I see that the waste is going to be 6" long or so. This really depends on how big your waste piece is going to be and how droopy it will become during the cut.
We need to say a word about blades. Cheap blades will burn or leave a splintery mess in their wake. Buy nice blades and take care of them – wipe them clean with your WD-40 rag at the end of your shop time. After years of trying out different blades, we generally have two kinds of blades in our shop. I like the Bosch T234X Progressor blades, with 11 teeth per inch (tpi in shop lingo).
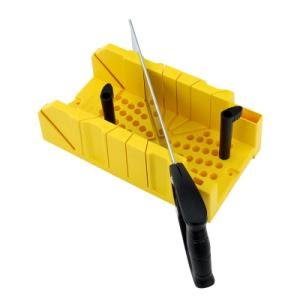
Hand miter box
You can use a hand miter box equipped with a back saw to make straight or precisely angled cuts in molding and decorative trim pieces.
To make cuts with a hand miter box, line the blade of the saw up with the cutting line on your work piece so the width of the blade is on the waste side of the mark. Hold the work piece securely in place against the box fence, and start the cut with a back stroke. Keep the blade level with the work piece on each side of the stroke cut.
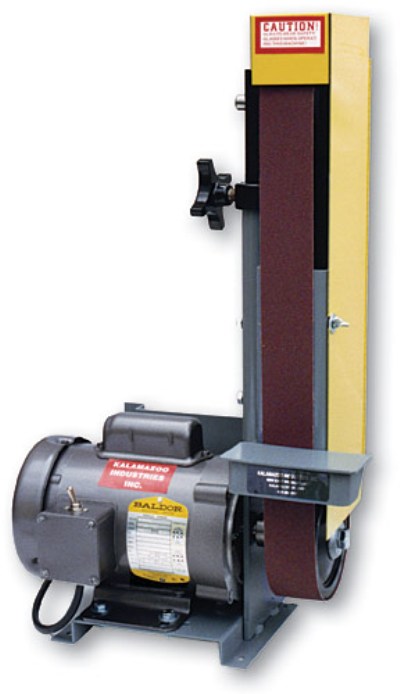
Belt Sander
A belt sander makes short work of sanding tasks and can also be used as a shaping tool.
When operating a belt sander, apply even pressure and always sand with the grain of the work piece. Do not hold a belt sander in one place for an extended period of time, or you may scorch the surface of the wood.
To use a belt sander as shaping tool, mount it to your workbench in a bench top vise with a large hand screws or C clamps. Then clamp a scrap board to your workbench to use as a platform. Keep the work piece square and level with the sanding belt. To create identical shapes, clamp the pieces together before shaping them. This technique is known as gang-sanding.
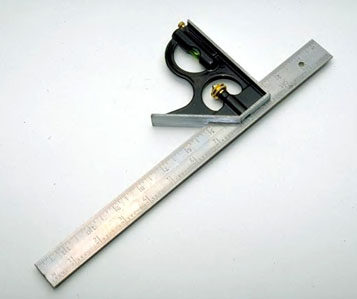
Combination square
The combination square is a multi purpose measuring tool available with standard ruler lengths of 12" or 16". Combination squares are used to measure and mark cutting lines, check projects for square and level, and mark 45 and 90 degree angles.
Although precise measurements can be made with a ruler or tape measure, the combination square speeds up the process and simplifies accurate measuring and marking.
This is the tool that will lay out your joints and cuts, and check all your work to ensure your cuts are accurate. The home center should have a few different brands available with some variation in price.
Here’s what’s important:
First, the square must be square. The ruler and head must meet at 90° or the tool is worthless. There are ways to tweak a faulty square, but we don’t recommend them. It’s not something you should have to do. This is why you brought the wood and the pencil along with you – they will help you sort through the pile of combination squares to fi nd the most accurate one in the bunch. Don’t be embarrassed to do this in the store; they should be embarrassed that you have to do this.
First, take the ruler and press one edge against the straight edge of your board to confi rm that the edge is straight. Generally you don’t want to see any light peeking out between the ruler and the wood. If your wood is out of whack, wander over to the lumber section to look for an offcut to borrow. Usually there’s a barrel by the panel saw or radial arm saw where they cut down big stock into small stock for customers.
With the square reassembled, press the head of the combination square against the straight edge of the board and use your fingers to hold the ruler down and steady against the face of the board. With a pencil, scribe a thin line along the edge of the ruler. Make it as thin and consistent as possible. If the square moves or the line changes thickness, simply move the square and try again.
Now flip the square over so the otherface of the ruler is fl at against the face of your board and hold the head of the square against the edge. Push the square up to your perfect line; this is called “showing the line to the square.” If the edge of the ruler is perfectly parallel to your pencil line, you have found a square that is indeed square. Congratulations. If the line is slightly off, try the test again. If it’s off in the same way, put the square back for another sucker, er – shopper.
Now look at the ruler itself. It must be readable. Look for fine dimension marks. Better-quality squares will have them engraved in the metal rather than printed on. Ideally, you want the ruler to have different scales on each edge. The best combination squares will have one scale in 8ths of an inch, another in 16ths, 32nds and 64ths. You can get away without the 64ths. The 32nds are helpful in most cases. The 16ths are non-negotiable and necessary.
Remove the square from its head by loosening the nut below the ruler. The ruler should be easy to remove and replace. You’ll be doing this quite a bit. Now tighten up the nut and make sure the ruler locks firmly in place. It should stay put when you tug on it.
Check out the rest of the square. Is there a bubble level in the head? Yes? No? It doesn’t much matter; it’s mostly worthless in such a small tool. Is there a removable scribe/scratch awl in the head? Again, pretty worthless in my book. I seem to lose mine right away, but never miss it. It’s too small to use anyway.
Treat your combination square like it is a holy relic. If it gets knocked to the floor, curse yourself and then test it immediately. If it’s out of true, get in your car and head back to the hardware store. Throw away the old head but keep the ruler – it’s still useful. Never slide the ruler needlessly through the head (I’ve seen some people who do this like it’s a nervous tic). This activity wears the area where the head meets the ruler. I’ve had squares that went out of true after only a couple hundred full-length motions through the head. If that happens to you, buy a better brand of square next time.
Compass
A compass is a simple, yet indispensable tool, that is often overlooked or forgotten. I suggest using a compass and a grid pattern to create detailed curves and shapes. To do this, you'll need to enlarge and copy the provided grid pattern onto your workspace, and use the grid to mark accurate corners and endpoints for the shapes. Then use a compass to create smooth round overs and curves that connect the points.

Miter Saws
These saws were once the province of the high-end finish carpenter. Then the rough carpenters started using them (where they’re called chop saws) as did the furniture makers. Each profession leans on a different feature of the tool to do their work. Finish carpenters like the combination of portability and accuracy. Carpenters like the speed and power. Furniture makers like the accuracy and safety compared to a radial-arm saw (sometimes called the "radical-harm saw”).
These tools are rarely perfect out of the box. They require tweaking for furniture work, plus they require a different way of working that we’ll discuss later. But by and large they are incredible tools once you understand a few things.
Styles of Saws
There are three major saws in the miter saw family:
Straight Miter Saw: This saw makes miters at any angle, usually between 47° left and 47° right at minimum. The cut this saw makes will always be 90° to the face of the work.
Compound Miter Saw: This saw does everything a straight miter saw does, plus the head can tip right (or both right and left) to make compound cuts. Compound cuts are angled in two directions, across the face of the board and across its thickness. This feature is used by trim carpenters for installing crown molding.
Sliding Compound Miter Saw: This saw does everything the above saws do, but it also runs on a sliding carriage, which allows you to cut wide boards – most of these saws will cut a 12"-wide board; some go as far up as 16". These saws are as expensive as a good entry-level table saw and most of the features are little-used by a furniture maker.
So which saw do you need? Really? Probably just a straight miter saw. These are getting harder to find these days, so you might have to step up to a compound miter saw. And even these are getting cheap. Thanks to overseas manufacturing, I’ve seen good 10" compound miter saws for about $100 or a little more. What about the blade size? The 12" saws are notably more expensive, though it’s nice for the occasional cut where you really need the extra width. However, we honestly think you can get by just fine with a 10" saw.
Important Features
These saws can be loaded with extras, so let’s cut through the clutter here. Two things are really important with this tool. First, it has to have a decent carbide-tooth blade that is capable of making clean fi nish cuts. Look for a blade with at least 40 teeth (and as many as 80). The more teeth you have, the smoother the cut, but having more teeth slows the cut and increases the chance you’ll burn the work. And if you fall for a cheap saw that comes with a high-speed steel blade, you’ll be upgrading it immediately and probably spending a good deal more money than you have to.
Second, you need a saw that is easy to adjust so the blade is 90° to the fence. Note that I’m not talking about the little handle up front that allows you to swing the head left and right. I’m talking about adjusting the tool so that when the head is locked at 90° it makes a perfect 90° cut. Sometimes you have to adjust the fence behind the blade, sometimes you adjust the points where the head locks down. We prefer this second method of adjusting the saw because it is faster and it doesn’t ever result in you bending the fence. I’ve bent a couple, even while being careful. And when the fence is bent, you’ll never get a square cut on both sides of the blade.
Follow the manufacturer’s directions for squaring up the tool, and then make a sample cut and check it with your combination square. This brings us to another critical aspect of miter saws: How you make the cut. I’ve found that the number one cause of errors in this tool is not that the fence is off, it’s that the work has shifted slightly during the cut, spoiling your accuracy.
The problem is these tools have fences and tables that are make of machined aluminum, which is slippery. So it’s quite difficult to hold your work perfectly still during the cut. It’s possible, of course, just difficult. Some manufacturers supply a hold-down clamp to secure the work against the table. These can be slow and can get in the way. The best solution I’ve found is to apply a layer of #120-grit peeland- stick sandpaper to both sides of the fence. This works wonders.
The other way to spoil your accuracy is by taking too light of a cut and taking it too fast. For example, let’s say you want to trim 1⁄32" off the end of a board. You line up the board as best you can and make your cut. It’s not a lot of material so you make the cut quickly. Sometimes, not always, the blade can deflect out when you do this. This results in a cut that is not 90° to the face of the board. If you need to make a cut like this, take it a bit slower in order to keep the blade true.
The bottom line with this tool is that it’s always best to check your work, especially if you don’t have some sort of stop to constrain it from slipping around. So cut each joint and try each joint. You’ll be fi ne.
Other features of miter saws are less important. We haven’t become fans of lasers on these saws yet. That may change, however, once they get them working just right. The raw amperage of these saws is mostly a non-issue. Almost all of them list their power as 15 amps, which is the maximum for a typical 120- volt household circuit and plug. All of the saws we’ve tested, even the cheapies, have enough power to cut standard material thicknesses with no complaint. The dust collection on all of them is quite poor – learn to live with it.
A few saws allow you to do stop cuts to make grooves or trenches across your work. You’ll probably never use this feature. There are also high fences (best for crown moulding) and gizmos that allow you to micro-adjust your miter settings. These are not deal-breakers (or deal-makers).
 |
SuperShedPlans.com
2870 Ashwood Road
Columbia, TN, 38401 |
|